You can view the list of unused image files in the RoboHelp
project from: Tools>Reports>Unused Files. However, you cannot
delete those files from the RoboHelp project. You can delete the file names
from the Windows Explorer, which is a tedious work and prone to error. It
becomes more challenging when the size of your project is big and files got
filled up during several updates.
RoboHelp support java script to automate the task in the
project. Don’t worry if you are not expert in java script. You can download the
imagecleanup.jsx that is freely available at: https://www.wvanweelden.eu/product/image-cleanup
- Open the RoboHelp project for which you want to delete unused images.
- To open the Script Explorer pod, click View>Pods>Script Explorer.
The Script Explorer pod opens. - In the Script
Explorer pod, click the Import Script files
 icon.The Select script files to import
dialog box opens.
icon.The Select script files to import
dialog box opens. Image: Select Script files to import
 - Select the imagecleanup.jsx file and click Open. The script is added in RoboHelp.
- To delete the unused images from RoboHelp,
select the script and click the Run Selected script File
 icon.
icon.

Image: Choose action - In the Choose
action dialog box, click Remove
unused images. Note: Take backup of unused files as these images are deleted
permanently from the location.

Image: Script Alert - In the Script Alert dialog box, click Yes.
- The Output View pod displays a list of all the images that are removed.
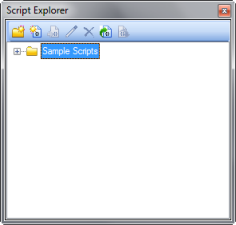
Image: Add caption
1 comment:
Hi,
Can you please share this image-cleanup.jsx. This link of website shared doesnt work.
Post a Comment